> ## Documentation Index
> Fetch the complete documentation index at: https://doc-test-my.mintlify.site/llms.txt
> Use this file to discover all available pages before exploring further.
# 1. Build Integration
> Steps to integrate your Razorpay iOS Custom SDK with Razorpay Payment Gateway.
Follow the steps to integrate the Razorpay iOS Custom SDK:
**1.1** [Import Razorpay.framework library to Your Project](#1-1-import-razorpay-framework-library-to-your-project).
* [Cocoapod](#cocoapod)
* [Manual](#manual)
* [Objective-C](#objective-c)
**1.2** [Initialise Razorpay iOS Custom SDK](#1-2-initialise-razorpay-ios-custom-sdk).
**1.3** [Create an Order in Server](#1-3-create-an-order-in-server).
**1.4** [Get Payment Methods](#1-4-get-payment-methods).
**1.5** [Initiate Payment](#1-5-initiate-payment).
**1.6** [Pass WKNavigationDelegate actions to SDK](#1-6-pass-wknavigationdelegate-actions-to-sdk).
**1.7** [Handle Success and Errors Events](#1-7-handle-success-and-error-events).
**1.8** [Store Fields in Your Server](#1-8-store-the-fields-in-server).
**1.9** [Verify Payment Signature](#1-9-verify-payment-signature).
**1.10** [Verify Payment Status](#1-10-verify-payment-status).
## 1.1 Import Razorpay.framework library to Your Project
You can import the Razorpay iOS Custom SDK library using any of these ways: Cocoapod, Manual and Objective-C.
#### Cocoapod
Refer to our [Cocoapod](https://cocoapods.org/pods/razorpay-customui-pod) pod.
#### Manual
1. Download the file and unzip the SDK attachment.
2. Open your project in XCode and go to **file** under **Menu** and select **Add files to "yourproject"**.
3. Select **Razorpay.xcframework** in the directory you just unzipped.
4. Click on the **Copy items if needed** checkbox.
5. Click **Add**.
Ensure that you have the framework added in both **Embedded Binaries** and **Linked Frameworks and Libraries** under **Target settings - General**.
#### Objective-C
If you are building an **Objective-C** project, follow the steps given for Swift and the additional steps given below:
1. Go to **Project Settings** and select **Build Settings - All and Combined**.
2. Set the **Always Embed Swift Standard Libraries** option to **TRUE**.
Ensure that you have the framework added in both **Embedded Binaries** and **Linked Frameworks and Libraries** under **Target settings - General**.
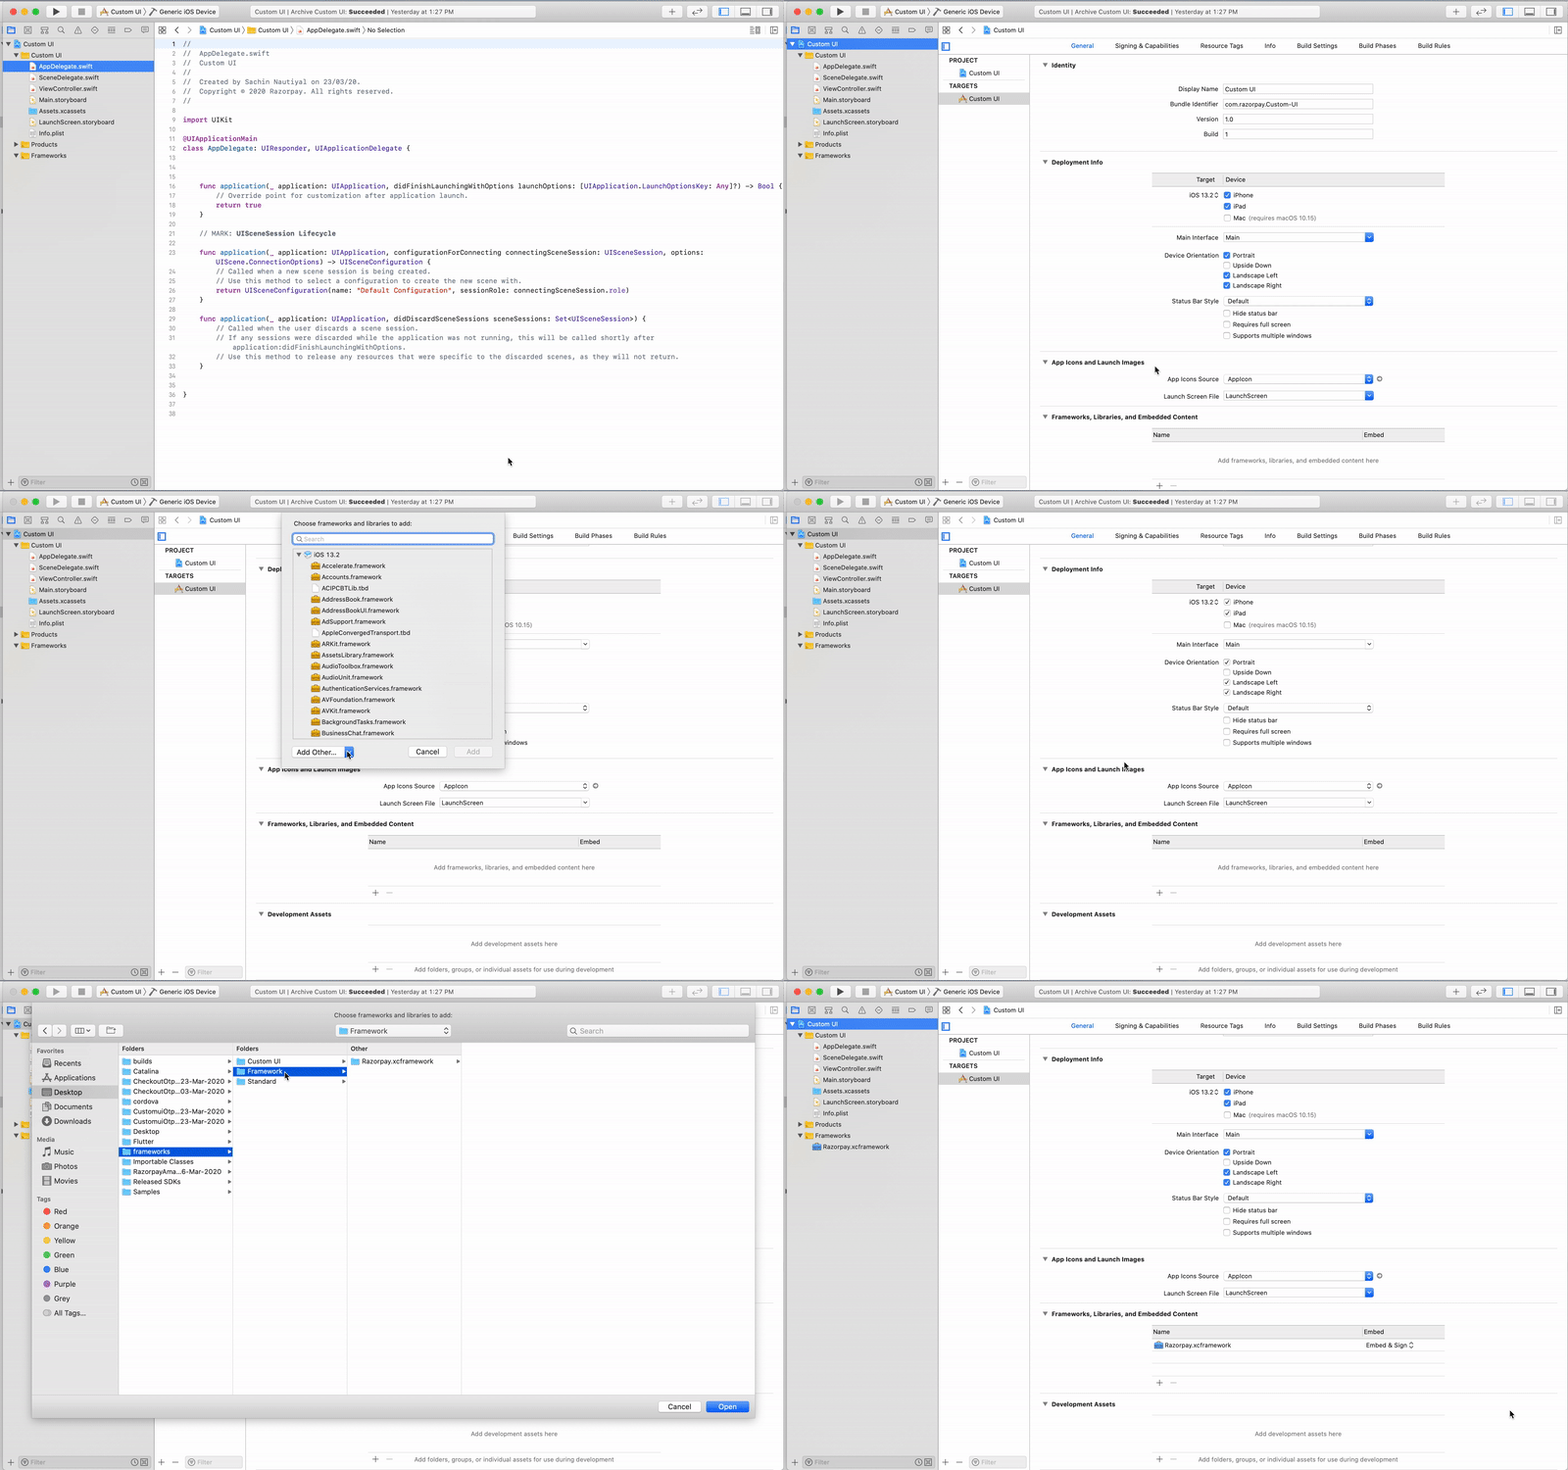
#### Xcode 11
Ensure that you have the framework added in **Frameworks, Libraries, and Embed Content** under **Target settings - General**. Change `Embed status` from - `Do not Embed` to `Embed & Sign`.
Watch the GIF to see how to add Frameworks, Libraries and Embed Content.
 ## 1.2 Initialise Razorpay iOS Custom SDK
To initialise the Razorpay SDK:
* API key. You can generate this from the [Dashboard](/docs/payments/dashboard/account-settings/api-keys).
**Watch Out!**
API keys should not be hardcoded in the app. They must be sent from your backend as app-related metadata fetch.
* A delegate that implements `RazorpayPaymentCompletionProtocol` and `WKNavigationDelegate`
* A `WKWebView` to show the bank pages
**Watch Out!**
* For Swift version 5.1+, ensure to declare `var razorpay: RazorpayCheckout!`.
* For versions lower than 5.1, use `var razorpay: Razorpay!`.
* Alternatively, you can use the following alias and retain the variable as Razorpay.
## 1.2 Initialise Razorpay iOS Custom SDK
To initialise the Razorpay SDK:
* API key. You can generate this from the [Dashboard](/docs/payments/dashboard/account-settings/api-keys).
**Watch Out!**
API keys should not be hardcoded in the app. They must be sent from your backend as app-related metadata fetch.
* A delegate that implements `RazorpayPaymentCompletionProtocol` and `WKNavigationDelegate`
* A `WKWebView` to show the bank pages
**Watch Out!**
* For Swift version 5.1+, ensure to declare `var razorpay: RazorpayCheckout!`.
* For versions lower than 5.1, use `var razorpay: Razorpay!`.
* Alternatively, you can use the following alias and retain the variable as Razorpay.
`typealias Razorpay = RazorpayCheckout`
```swift ViewController.swift theme={null}
import Razorpay
class ViewController: UIViewController, RazorpayPaymentCompletionProtocol, WKNavigationDelegate {
// typealias Razorpay = RazorpayCheckout
var webView: WKWebView!
var razorpay: RazorpayCheckout!
.
.
override func viewDidLoad() {
super.viewDidLoad()
self.webView = WKWebView(frame: self.view.frame)
self.razorpay = RazorpayCheckout.initWithKey("Key", andDelegate: self, withPaymentWebView: self.webView)
self.view.addSubview(self.webView)
}
}
```
```objectivec ViewController.m theme={null}
#import "Razorpay/Razorpay.h"
// typealias Razorpay = RazorpayCheckout
@interface ViewController() {
RazorpayCheckout *razorpay;
WKWebView *webView;
}
.
.
- (void)viewDidLoad {
[super viewDidLoad];
webView = [[WKWebView alloc] initWithFrame:self.view.frame];
razorpay = [RazorpayCheckout initWithKey:@"KEY" andDelegate:self withPaymentWebView:webView];
[self.view addSubview:webView];
}
```
**Initialise the Razorpay SDK only with API Key**
To render your UI based on the available payment methods, initialise the Razorpay SDK only with the API key and call [getPaymentMethods](#1-4-get-payment-methods).
```swift ViewController.swift theme={null}
self.razorpay = RazorpayCheckout.initWithKey("KEY")
```
```objectivec ViewController.m theme={null}
razorpay = [RazorpayCheckout initWithKey:@"KEY"];
```
To use the SDK initialisation mentioned above, call the following method using the previously created Razorpay instance on any other page where you wish to initiate the payment through the authorise method.
```swift ViewController.swift theme={null}
do {
try self.razorpay?.setWebView(self.wkWebView)
try self.razorpay?.setDelegate(self)
} catch {
print(error.localizedDescription)
}
```
```objectivec ViewController.m theme={null}
@try {
[razorpay setWebView:webView error: NULL];
[razorpay setDelegate:self error: NULL];
} @catch (NSException *exception) {
NSLog(@"exception triggered");
}
```
## 1.3 Create an Order in Server
**Order is an important step in the payment process.**
* An order should be created for every payment.
* You can create an order using the [Orders API](#api-sample-code). It is a server-side API call. Know how to [authenticate](/docs/payments/dashboard/account-settings/api-keys#generate-api-keys) Orders API.
* The `order_id` received in the response should be passed to the checkout. This ties the order with the payment and secures the request from being tampered.
**Watch Out!**
Payments made without an `order_id` cannot be captured and will be automatically refunded. You must create an order before initiating payments to ensure proper payment processing.
#### API Sample Code
Use this endpoint to create an order using the Orders API.
`POST /orders`
```bash Curl theme={null}
curl -X POST https://api.razorpay.com/v1/orders
-U [YOUR_KEY_ID]:[YOUR_KEY_SECRET]
-H 'content-type:application/json'
-d '{
"amount": 100,
"currency": "MYR",
"receipt": "qwsaq1",
"partial_payment": true,
"first_payment_min_amount": 230,
"notes": {
"key1": "value3",
"key2": "value2"
}
}'
```
```java Java theme={null}
RazorpayClient razorpay = new RazorpayClient("[YOUR_KEY_ID]", "[YOUR_KEY_SECRET]");
JSONObject orderRequest = new JSONObject();
orderRequest.put("amount", 100); // amount in the smallest currency unit
orderRequest.put("currency", "MYR");
orderRequest.put("receipt", "order_rcptid_11");
Order order = razorpay.Orders.create(orderRequest);
} catch (RazorpayException e) {
// Handle Exception
System.out.println(e.getMessage());
}
```
```python Python theme={null}
import razorpay
client = razorpay.Client(auth=("YOUR_ID", "YOUR_SECRET"))
DATA = {
"amount": 100,
"currency": "MYR",
"receipt": "receipt#1",
"notes": {
"key1": "value3",
"key2": "value2"
}
}
client.order.create(data=DATA)
```
```php PHP theme={null}
$api = new Api($key_id, $secret);
$api->order->create(array('receipt' => '123', 'amount' => 100, 'currency' => 'MYR', 'notes'=> array('key1'=> 'value3','key2'=> 'value2')));
```
```csharp .NET theme={null}
RazorpayClient client = new RazorpayClient("[YOUR_KEY_ID]", "[YOUR_KEY_SECRET]");
Dictionary options = new Dictionary();
options.Add("amount", 100); // amount in the smallest currency unit
options.add("receipt", "order_rcptid_11");
options.add("currency", "MYR");
Order order = client.Order.Create(options);
```
```ruby Ruby theme={null}
require "razorpay"
Razorpay.setup('YOUR_KEY_ID', 'YOUR_SECRET')
options = amount: 100, currency: 'MYR', receipt: ''
order = Razorpay::Order.create
```
```javascript Node.js theme={null}
var instance = new Razorpay({ key_id: 'YOUR_KEY_ID', key_secret: 'YOUR_SECRET' })
instance.orders.create({
amount: 100,
currency: "MYR",
receipt: "receipt#1",
notes: {
key1: "value3",
key2: "value2"
}
})
```
```go Go theme={null}
import ( razorpay "github.com/razorpay/razorpay-go" )
client := razorpay.NewClient("YOUR_KEY_ID", "YOUR_SECRET")
data := map[string]interface{}{
"amount": 100,
"currency": "MYR",
"receipt": "some_receipt_id"
}
body, err := client.Order.Create(data)
```
```json Success Response theme={null}
{
"id": "order_IluGWxBm9U8zJ8",
"entity": "order",
"amount": 100,
"amount_paid": 0,
"amount_due": 100,
"currency": "MYR",
"receipt": "rcptid_11",
"offer_id": null,
"status": "created",
"attempts": 0,
"notes": [],
"created_at": 1642662092
}
```
```json Failure Response theme={null}
{
"error": {
"code": "BAD_REQUEST_ERROR",
"description": "Order amount less than minimum amount allowed",
"source": "business",
"step": "payment_initiation",
"reason": "input_validation_failed",
"metadata": {},
"field": "amount"
}
}
```
`amount` *mandatory*
: `integer` Payment amount in the smallest currency subunit. For example, if the amount is ₹500, enter `50000`.
`currency` *mandatory*
: `string` The currency in which the payment should be made by the customer. Length must be of 3 characters.
`receipt` *optional*
: `string` Your receipt id for this order should be passed here. Maximum length is 40 characters.
`notes` *optional*
: `json object` Key-value pair that can be used to store additional information about the entity. Maximum 15 key-value pairs, 256 characters (maximum) each. For example, `"note_key": "Beam me up Scotty”`.
`partial_payment` *optional*
: `boolean` Indicates whether the customer can make a partial payment. Possible values:
* `true`: The customer can make partial payments.
* `false` (default): The customer cannot make partial payments.
`first_payment_min_amount` *optional*
: `integer` Minimum amount that must be paid by the customer as the first partial payment. For example, if an amount of ₹7000 is to be received from the customer in two installments of #1 - ₹5000, #2 - ₹2000 then you can set this value as `500000`. This parameter should be passed only if `partial_payment` is `true`.
Know more about [Orders API](https://razorpay.com/docs/api/orders).
Descriptions for the response parameters are present in the [Orders Entity](/docs/api/orders/entity) parameters table.
The error response parameters are available in the [API Reference Guide](/docs/api/orders/create).
## 1.4 Get Payment Methods
You can accept payments through wallets, FPX, credit and debit cards depending on the methods enabled for your account. When you use [Razorpay iOS Standard SDK](/docs/payments/payment-gateway/ios-integration/standard), you do not have to handle the availability of different payment methods. However, when creating a custom checkout form, ensure the display of only the methods activated for your account to the customer.
To get a list of available payment methods, call `getPaymentMethods`. This fetches the list of payment methods asynchronously and returns the results.
```swift ViewController.swift theme={null}
self.razorpay.getPaymentMethods(withOptions: nil, withSuccessCallback: {methods in
paymentMethods = methods
}){ error in
errorDescription = error
}
```
```objectivec ViewController.m theme={null}
[razorpay getPaymentMethodsWithOptions: nil withSuccessCallback: ^(NSDictionary *methods){
for(NSString *key in [methods allKeys]) {
NSLog(@"%@",[methods objectForKey:key]);
}
} andFailureCallback: ^(NSString *error){
NSLog(@"%@",error);
}];
```
## 1.5 Initiate Payment
Once you receive the required input from the customer, pass them to our SDK, which takes them to the appropriate authentication channel.
Add the following code where you want to initiate payment:
```swift ViewController.swift theme={null}
let options: [String:Any] = [
"amount": 100, // amount in currency subunits.
"currency": "MYR",//We support more that 92 international currencies.
"email": "nur.aisyah@example.com",
"contact": "+60345675444",
"order_id": "order_DBJOWzybf0sJbb",//From response of Step 3
"method": "card",
"card[name]": "Nur Aisyah",
"card[number]": "5272008806235704",
"card[expiry_month]": 06,
"card[expiry_year]": 30,
"card[cvv]": "123"
]
razorpay.authorize(options)
```
```objectivec ViewController.m theme={null}
NSDictionary *options = @{
@"amount": @"100", // amount in currency subunits.
@"currency": @"MYR",////We support more that 92 international currencies.
@"email": @"nur.aisyah@example.com",
@"contact": @"+60345675444",
@"order_id": @"order_4xbQrmEoA5WJ0G",
@"method": @"wallet",
@"wallet": @"touchngo"
};
```
Below is a complete list of Checkout form parameters:
`key` *mandatory*
: `string` API Key ID generated from the Razorpay Dashboard.
`amount` *mandatory*
: `integer` The amount to be paid by the customer in currency subunits. For example, if the amount is ₹100, enter `10000`.
`currency` *mandatory*
: `string` The currency in which the payment should be made by the customer.
`description` *optional*
: `string` Description of the product shown in the Checkout form. It must start with an alphanumeric character.
`image` *optional*
: `string` Link to an image (usually your business logo) shown in the Checkout form. Can also be a **base64** string, if loading the image from a network is not desirable.
`order_id` *mandatory*
: `string` Order ID generated via the [Orders API](https://razorpay.com/docs/api/orders).
`notes` *optional*
: `object` Set of key-value pairs that can be used to store additional information about the payment. It can hold a maximum of 15 key-value pairs, each 256 characters long (maximum).
`method` *mandatory*
: `string` The payment method used by the customer on Checkout.
Possible values:
* `card` (default)
* `fpx` (default)
* `wallet` (default)
`card` *mandatory if method=card*
: `object` The details of the card that should be entered while making the payment.
`number`
: `integer` Unformatted card number.
`name`
: `string` The name of the cardholder.
`expiry_month`
: `integer` Expiry month for card in MM format.
`expiry_year`
: `integer` Expiry year for card in YY format.
`cvv`
: `integer` CVV printed on the back of the card.
`bank` *mandatory if method=fpx*
: `string` Bank code. List of available banks enabled for your account can be fetched via [**methods**](/docs/payments/payment-gateway/web-integration/custom/payment-methods#fetch-supported-methods).
`wallet` *mandatory if method=wallet*
: `string` Wallet code for the wallet used for the payment. Possible values:
* `touchngo` (default)
* `grabpay` (default)
* `shopback` (requires [approval](https://razorpay.com/support/#request))
`callback_url` *optional*
: `string` Customers will be redirected to this URL on successful payment. Ensure that the domain of the Callback URL is whitelisted. This parameter is mandatory for FPX payments.
`redirect` *optional*
: `boolean` Determines whether to post a response to the event handler post payment completion or redirect to Callback URL. `callback_url` and `redirect` parameters are mandatory for FPX payments. Possible values:
* `true`: Customer is redirected to the specified callback URL in case of payment failure. For FPX payments, the `redirect` parameter should always be sent as `true`.
* `false` (default): Customer is not redirected to the specified callback URL.
**Handy Tips**
The `notes` field is a read-only field associated with payment and is returned while fetching payment details. Razorpay Curlec cannot modify this field. You can add up to 15 `notes` that will then be associated with the payment. For example: `"notes[internal_key_1]", "notes[internal_key_2]")`. Razorpay Curlec returns this when you fetch payment details from the API.
## 1.6 Pass WKNavigationDelegate actions to SDK
SDK handles the responses from WKWebView to give you the correct status of the payment.
```swift ViewController.swift theme={null}
override func viewDidLoad() {
super.viewDidLoad()
.
.
self.webView.navigationDelegate = self
}
public func webView(_ webView: WKWebView, didCommit navigation: WKNavigation!){
if razorpay != nil{
self.razorpay.webView(webView, didCommit: navigation)
}
}
public func webView(_ webView: WKWebView, didFailProvisionalNavigation navigation: WKNavigation!, withError er: Error) {
if razorpay != nil{
self.razorpay.webView(webView, didFailProvisionalNavigation: navigation, withError: er)
}
}
public func webView(_ webView: WKWebView, didFail navigation: WKNavigation!, withError er: Error){
if razorpay != nil{
self.razorpay.webView(webView, didFail: navigation, withError: er)
}
}
public func webView(_ webView: WKWebView, didFinish navigation: WKNavigation!){
if razorpay != nil{
self.razorpay.webView(webView, didFinish: navigation)
}
}
```
```objectivec ViewController.m theme={null}
override func viewDidLoad(){
super.viewDidLoad();
.
.
webView.navigationDelegate = self;
}
- (void)webView:(WKWebView *)webView didCommitNavigation:(WKNavigation *)navigation{
if (razorpay){
[razorpay webView:webView didCommit:navigation];
}
}
- (void)webView:(WKWebView *)webView didFailProvisionalNavigation:(WKNavigation *)navigation withError:(NSError *)error{
if (razorpay){
[razorpay webView:webView didFailProvisionalNavigation:navigation withError:error];
}
}
- (void)webView:(WKWebView *)webView didFailNavigation:(WKNavigation *)navigation withError:(NSError *)error{
if (razorpay){
[razorpay webView:webView didFail:navigation withError:error];
}
}
- (void)webView:(WKWebView *)webView didFinishNavigation:(WKNavigation *)navigation{
if (razorpay){
[razorpay webView:webView didFinish:navigation];
}
}
```
## 1.7 Handle Success and Error Events
This is done by implementing the `onPaymentSuccess` and `onPaymentError` methods of the `RazorpayPaymentCompletionProtocol`.
We recommend giving the user an option to cancel the payment midway and pass on this action. You may also implement a retry action or display a relevant message at this step based on your use case.
```swift ViewController.swift theme={null}
func onPaymentError(_ code: Int32, description str: String, andData response: [AnyHashable : Any]){
let alertController = UIAlertController(title: "FAILURE", message: str, preferredStyle: UIAlertControllerStyle.alert)
let cancelAction = UIAlertAction(title: "OK", style: UIAlertActionStyle.cancel, handler: nil)
alertController.addAction(cancelAction)
//self.view = view that controller manages
self.view.sendSubview(toBack: self.webView)
navBar.isHidden = true
navBar.isUserInteractionEnabled = false
self.view.window?.rootViewController?.present(alertController, animated: true, completion: nil)
self.razorpay = nil
}
func onPaymentSuccess(_ payment_id: String, andData response: [AnyHashable : Any]){
let alertController = UIAlertController(title: "SUCCESS", message: "Payment Id \(payment_id)", preferredStyle: UIAlertControllerStyle.alert)
let cancelAction = UIAlertAction(title: "OK", style: UIAlertActionStyle.cancel, handler: nil)
alertController.addAction(cancelAction)
//self.view = view that controller manages
self.view.sendSubview(toBack: self.webView)
navBar.isHidden = true
navBar.isUserInteractionEnabled = false
self.view.window?.rootViewController?.present(alertController, animated: true, completion: nil)
self.razorpay = nil
}
//MARK: Action functions
@IBAction func cancel(_ sender: Any){
let alertController = UIAlertController(title: "Cancel Transaction", message: "Are you sure you want to cancel the current transaction ? The page will go back to the checkout page, where you can choose another payment option", preferredStyle: UIAlertControllerStyle.alert)
let cancelAction = UIAlertAction(title: "Do Not Cancel", style: UIAlertActionStyle.cancel, handler: nil)
let okayAction = UIAlertAction(title: "Cancel", style: UIAlertActionStyle.destructive, handler: { action in
self.razorpay.userCancelledPayment()
} )
alertController.addAction(cancelAction)
alertController.addAction(okayAction)
self.view.window?.rootViewController?.present(alertController, animated: true, completion: nil)
}
```
```objectivec ViewController.m theme={null}
- (void)onPaymentError:(int)code description:(nonnull NSString *)str andData:(NSDictionary *)response {
[self.view sendSubviewToBack:webView];
navbar.hidden = true;
navbar.userInteractionEnabled = false;
razorpay = nil;
[[[UIAlertView alloc] initWithTitle:@"Error"
message:str
delegate:self
cancelButtonTitle:@"OK"
otherButtonTitles:nil] show];
}
- (void)onPaymentSuccess:(nonnull NSString *)payment_id andData:(NSDictionary *)response {
[self.view sendSubviewToBack:webView];
navbar.hidden = true;
navbar.userInteractionEnabled = false;
razorpay = nil;
[[[UIAlertView alloc] initWithTitle:@"Payment Successful"
message:payment_id
delegate:self
cancelButtonTitle:@"OK"
otherButtonTitles:nil] show];
}
-(void) cancel:(id)sender{
[[[UIAlertView alloc] initWithTitle:@"Payment Cancelled" message:@"You cancelled the payment. Please retry or let us know at your-help-email@your-domain.com in case of any difficulty." delegate:self cancelButtonTitle:@"OK" otherButtonTitles:nil] show];
[self onPaymentError:-1 description:@"User Cancelled Payment" andData:@{}];
[razorpay userCancelledPayment];
}
```
Success handler will receive `payment_id` that you can use later to capture the payment.
## 1.8 Store the Fields in Server
A successful payment returns the following fields to the Checkout form.
* You need to store these fields in your server.
* You can confirm the authenticity of these details by verifying the signature in the next step.
```json Success Callback theme={null}
{
"razorpay_payment_id": "pay_29QQoUBi66xm2f",
"razorpay_order_id": "order_9A33XWu170gUtm",
"razorpay_signature": "9ef4dffbfd84f1318f6739a3ce19f9d85851857ae648f114332d8401e0949a3d"
}
```
`razorpay_payment_id`
: `string` Unique identifier for the payment returned by Checkout **only** for successful payments.
`razorpay_order_id`
: `string` Unique identifier for the order returned by Checkout.
`razorpay_signature`
: `string` Signature returned by the Checkout. This is used to verify the payment.
## 1.9 Verify Payment Signature
This is a mandatory step to confirm the authenticity of the details returned to the Checkout form for successful payments.
1. Create a signature in your server using the following attributes:
* `order_id`: Retrieve the `order_id` from your server. Do not use the `razorpay_order_id` returned by Checkout.
* `razorpay_payment_id`: Returned by Checkout.
* `key_secret`: Available in your server. The `key_secret` that was generated from the [Dashboard](/docs/payments/dashboard/account-settings/api-keys#generate-api-keys).
2. Use the SHA256 algorithm, the `razorpay_payment_id` and the `order_id` to construct a HMAC hex digest as shown below:
```html HMAC Hex Digest theme={null}
generated_signature = hmac_sha256(order_id + "|" + razorpay_payment_id, secret);
if (generated_signature == razorpay_signature) {
payment is successful
}
```
3. If the signature you generate on your server matches the `razorpay_signature` returned to you by the Checkout form, the payment received is from an authentic source.
Given below is the sample code for payment signature verification:
```java Java theme={null}
RazorpayClient razorpay = new RazorpayClient("[YOUR_KEY_ID]", "[YOUR_KEY_SECRET]");
String secret = "testWebhookSecret1234567";
JSONObject options = new JSONObject();
options.put("razorpay_order_id", "order_IEIaMR65cu6nz3");
options.put("razorpay_payment_id", "pay_IH4NVgf4Dreq1l");
options.put("razorpay_signature", "0d4e745a1838664ad6c9c9902212a32d627d68e917290b0ad5f08ff4561bc50f");
boolean status = Utils.verifyPaymentSignature(options, secret);
```
```php PHP theme={null}
$api = new Api($key_id, $secret);
$api->utility->verifyPaymentSignature(array('razorpay_order_id' => $razorpayOrderId, 'razorpay_payment_id' => $razorpayPaymentId, 'razorpay_signature' => $razorpaySignature));
```
```ruby Ruby theme={null}
require "razorpay"
Razorpay.setup('YOUR_KEY_ID', 'YOUR_SECRET')
payment_response = {
razorpay_order_id: 'order_IEIaMR65cu6nz3',
razorpay_payment_id: 'pay_IH4NVgf4Dreq1l',
razorpay_signature: '0d4e745a1838664ad6c9c9902212a32d627d68e917290b0ad5f08ff4561bc50f'
}
Razorpay::Utility.verify_payment_signature(payment_response)
```
```python Python theme={null}
import razorpay
client = razorpay.Client(auth=("YOUR_ID", "YOUR_SECRET"))
client.utility.verify_payment_signature({
'razorpay_order_id': razorpay_order_id,
'razorpay_payment_id': razorpay_payment_id,
'razorpay_signature': razorpay_signature
})
```
```c .NET theme={null}
RazorpayClient client = new RazorpayClient("[YOUR_KEY_ID]", "[YOUR_KEY_SECRET]");
Dictionary options = new Dictionary();
options.Add("razorpay_order_id", "order_IEIaMR65cu6nz3");
options.Add("razorpay_payment_id", "pay_IH4NVgf4Dreq1l");
options.Add("razorpay_signature", "0d4e745a1838664ad6c9c9902212a32d627d68e917290b0ad5f08ff4561bc50f");
Utils.verifyPaymentSignature(options);
```
```javascript Node.js theme={null}
var instance = new Razorpay({ key_id: 'YOUR_KEY_ID', key_secret: 'YOUR_SECRET' })
var { validatePaymentVerification, validateWebhookSignature } = require('./dist/utils/razorpay-utils');
validatePaymentVerification({"order_id": razorpayOrderId, "payment_id": razorpayPaymentId }, signature, secret);
```
```go Go theme={null}
import ( razorpay "github.com/razorpay/razorpay-go" )
client := razorpay.NewClient("YOUR_KEY_ID", "YOUR_SECRET")
params := map[string]interface{}{
"razorpay_order_id": "order_IEIaMR65cu6nz3",
"razorpay_payment_id": "pay_IH4NVgf4Dreq1l",
}
signature := "0d4e745a1838664ad6c9c9902212a32d627d68e917290b0ad5f08ff4561bc50f";
secret := "testWebhookSecret1234567";
utils.VerifyPaymentSignature(params, signature, secret)
```
After you have completed the integration, you can [set up webhooks](/docs/webhooks/setup-edit-payments), make test payments, replace the test key with the live key and integrate with other [APIs](/docs/api).
## 1.10 Verify Payment Status
**Handy Tips**
On the Razorpay Dashboard, ensure that the payment status is `captured`. Refer to the payment capture settings page to know how to [capture payments automatically](/docs/payments/payments/capture-settings).
To verify the payment status from the Razorpay Dashboard:
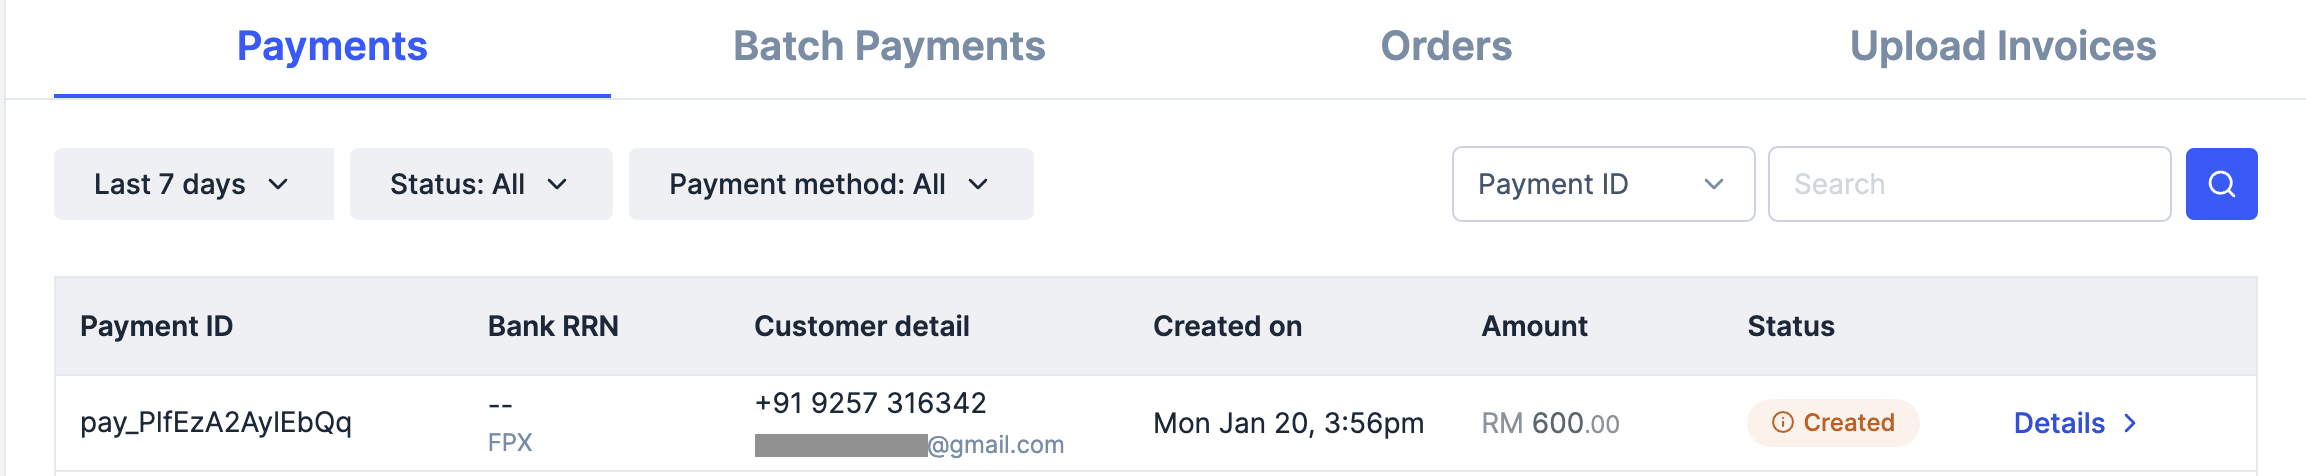
1. Log in to the Razorpay Dashboard and navigate to **Transactions** → **Payments**.
2. Check if a **Payment Id** has been generated and note the status. In case of a successful payment, the status is marked as **Captured**.
 You can use Razorpay webhooks to configure and receive notifications when a specific event occurs. When one of these events is triggered, we send an HTTP POST payload in JSON to the webhook's configured URL. Know how to [set up webhooks.](/docs/webhooks/setup-edit-payments)
#### Example
If you have subscribed to the `order.paid` webhook event, you will receive a notification every time a customer pays you for an order.
[Poll Payment APIs](/docs/api/payments/fetch-all-payments) to check the payment status.
## Next Steps
[Step 2: Test Integration](/docs/payments/payment-gateway/ios-integration/custom/test-integration)
You can use Razorpay webhooks to configure and receive notifications when a specific event occurs. When one of these events is triggered, we send an HTTP POST payload in JSON to the webhook's configured URL. Know how to [set up webhooks.](/docs/webhooks/setup-edit-payments)
#### Example
If you have subscribed to the `order.paid` webhook event, you will receive a notification every time a customer pays you for an order.
[Poll Payment APIs](/docs/api/payments/fetch-all-payments) to check the payment status.
## Next Steps
[Step 2: Test Integration](/docs/payments/payment-gateway/ios-integration/custom/test-integration)