> ## Documentation Index
> Fetch the complete documentation index at: https://doc-test-my.mintlify.site/llms.txt
> Use this file to discover all available pages before exploring further.
# 1. Build Integration
> Steps to integrate your React Native Razorpay custom UI SDK with Razorpay Payment Gateway.
Follow the steps given below to use the SDK and integrate with Razorpay Payment Gateway:
**1.1** [Install Razorpay React Native Custom UI SDK](#1-1-install-razorpay-react-native-custom-ui-sdk).
**1.2** [Link SDK](#1-2-link-sdk).
**1.3** [Create an Order in Server](#1-3-create-an-order-in-server).
**1.4** [Fetch Payment Methods](#1-4-fetch-payment-methods).
**1.5** [Import Razorpay module](#1-5-import-razorpay-module).
**1.6** [Add Razorpay Checkout Options to app.js File](#1-6-add-razorpay-checkout-options-to-app-js-file).
**1.7** [Store Fields in Your Server](#1-7-store-fields-in-your-server).
**1.8** [Verify Payment Signature](#1-8-verify-payment-signature).
**1.9** [Verify Payment Status](#1-9-verify-payment-status).
**Watch Out!**
If you use M1 MacBook, you need to make [these changes](#m1-macbook-changes) in your `podfile`.
## 1.1 Install Razorpay React Native Custom UI SDK
You can install the SDK using NPM, Yarn and Expo.
To install using NPM, use the command given below:
```javascript Code using npm theme={null}
npm install --save react-native-customui
```
To install using Yarn, use the command given below:
```javascript Code using yarn theme={null}
yarn add react-native-customui
```
To install using Expo, use the command given below:
```javascript Code using expo theme={null}
npx expo install react-native-customui
```
## 1.2 Link SDK
* [iOS](#ios)
* [Android](#android)
#### iOS
#### Automatic
**Automatic linking is available only for iOS.** The steps are given below:
1. Install the Razorpay React Native Custom UI SDK using the npm command.
```javascript Install theme={null}
$ npm install react-native-customui --save
```
2. Navigate to the iOS folder on the terminal and run `pod install`.
**Handy Tips**
Ensure the **Razorpay.framework** file is added in the embedded binaries section and that the **Always Embed Swift Standard Binaries** option is set to **Yes** in **Build Settings**.
#### Manual (via CocoaPods)
You can link the SDK manually using CocoaPods. To do this:
1. Add the following line to your build targets in your Podfile.
```
pod 'react-native-customui', :path => '../node_modules/react-native-customui'
```
2. Run the following command:
```
pod install
```
#### Manual (without CocoaPods)
If you do not use CocoaPods, follow these steps to link the SDK manually:
1. In XCode, in the Project Navigator:
* Right click **Libraries**.
* Add Files to `[your project's name]`.
* Navigate to `node_modules/react-native-customui`.
* Add the `.xcodeproj` file.
2. In the project navigator, select your project.
* Add the `libRNDeviceInfo.a` from the `deviceinfo` project to your project's **Build Phases** ➜ **Link Binary With Libraries**.
* Click the `.xcodeproj` file you added before in the Project Navigator and navigate to the **Build Settings** tab. Ensure **All** is selected, and not **Basic**.
* Look for **Header Search Paths** and ensure it contains both `$(SRCROOT)/../react-native/React` and `$(SRCROOT)/../../React`.
* Mark both as recursive. It should be marked **OK** by default.
3. Run your project using **cmd+R**.
#### Expo Application
After adding the `react-native-razorpay` package, use the option to prebuild the app. This generates the **iOS** platform folders in the project to use native-modules.
```javascript Run theme={null}
npx expo prebuild
```
The application is installed on the device/emulator.
```javascript theme={null}
npx expo run:[ios] --device
```
#### Android
To link the SDK manually, follow these steps:
1. Open the `android/app/src/main/java/[...]/MainApplication.java` file. Add the following to the imports at the top of the file:
```java Import theme={null}
import com.razorpay.rn.RazorpayPackage;
```
2. Add `new RazorpayPackage()` to the list returned by the `getPackages()` method.
3. Append the following lines to `android/settings.gradle`:
```java Settings Gradle theme={null}
include ':react-native-razorpay'
project(':react-native-razorpay').projectDir = new File(rootProject.projectDir, '../node_modules/react-native-customui/android')
```
4. Insert the dependencies in `android/app/build.gradle`:
```java Dependencies theme={null}
implementation project(':react-native-customui')
```
#### Expo Application
After adding the `react-native-razorpay` package, use the option to prebuild the app. This generates the **android** platform folders in the project to use native-modules.
```javascript Run theme={null}
npx expo prebuild
```
The application is installed on the device/emulator.
```javascript theme={null}
npx expo run:[android] --device
```
## 1.3 Create an Order in Server
**Order is an important step in the payment process.**
* An order should be created for every payment.
* You can create an order using the [Orders API](#api-sample-code). It is a server-side API call. Know how to [authenticate](/docs/payments/dashboard/account-settings/api-keys#generate-api-keys) Orders API.
* The `order_id` received in the response should be passed to the checkout. This ties the order with the payment and secures the request from being tampered.
**Watch Out!**
Payments made without an `order_id` cannot be captured and will be automatically refunded. You must create an order before initiating payments to ensure proper payment processing.
#### API Sample Code
Use this endpoint to create an order using the Orders API.
`POST /orders`
```bash Curl theme={null}
curl -X POST https://api.razorpay.com/v1/orders
-U [YOUR_KEY_ID]:[YOUR_KEY_SECRET]
-H 'content-type:application/json'
-d '{
"amount": 100,
"currency": "MYR",
"receipt": "qwsaq1",
"partial_payment": true,
"first_payment_min_amount": 230,
"notes": {
"key1": "value3",
"key2": "value2"
}
}'
```
```java Java theme={null}
RazorpayClient razorpay = new RazorpayClient("[YOUR_KEY_ID]", "[YOUR_KEY_SECRET]");
JSONObject orderRequest = new JSONObject();
orderRequest.put("amount", 100); // amount in the smallest currency unit
orderRequest.put("currency", "MYR");
orderRequest.put("receipt", "order_rcptid_11");
Order order = razorpay.Orders.create(orderRequest);
} catch (RazorpayException e) {
// Handle Exception
System.out.println(e.getMessage());
}
```
```python Python theme={null}
import razorpay
client = razorpay.Client(auth=("YOUR_ID", "YOUR_SECRET"))
DATA = {
"amount": 100,
"currency": "MYR",
"receipt": "receipt#1",
"notes": {
"key1": "value3",
"key2": "value2"
}
}
client.order.create(data=DATA)
```
```php PHP theme={null}
$api = new Api($key_id, $secret);
$api->order->create(array('receipt' => '123', 'amount' => 100, 'currency' => 'MYR', 'notes'=> array('key1'=> 'value3','key2'=> 'value2')));
```
```csharp .NET theme={null}
RazorpayClient client = new RazorpayClient("[YOUR_KEY_ID]", "[YOUR_KEY_SECRET]");
Dictionary options = new Dictionary();
options.Add("amount", 100); // amount in the smallest currency unit
options.add("receipt", "order_rcptid_11");
options.add("currency", "MYR");
Order order = client.Order.Create(options);
```
```ruby Ruby theme={null}
require "razorpay"
Razorpay.setup('YOUR_KEY_ID', 'YOUR_SECRET')
options = amount: 100, currency: 'MYR', receipt: ''
order = Razorpay::Order.create
```
```javascript Node.js theme={null}
var instance = new Razorpay({ key_id: 'YOUR_KEY_ID', key_secret: 'YOUR_SECRET' })
instance.orders.create({
amount: 100,
currency: "MYR",
receipt: "receipt#1",
notes: {
key1: "value3",
key2: "value2"
}
})
```
```go Go theme={null}
import ( razorpay "github.com/razorpay/razorpay-go" )
client := razorpay.NewClient("YOUR_KEY_ID", "YOUR_SECRET")
data := map[string]interface{}{
"amount": 100,
"currency": "MYR",
"receipt": "some_receipt_id"
}
body, err := client.Order.Create(data)
```
```json Success Response theme={null}
{
"id": "order_IluGWxBm9U8zJ8",
"entity": "order",
"amount": 100,
"amount_paid": 0,
"amount_due": 100,
"currency": "MYR",
"receipt": "rcptid_11",
"offer_id": null,
"status": "created",
"attempts": 0,
"notes": [],
"created_at": 1642662092
}
```
```json Failure Response theme={null}
{
"error": {
"code": "BAD_REQUEST_ERROR",
"description": "Order amount less than minimum amount allowed",
"source": "business",
"step": "payment_initiation",
"reason": "input_validation_failed",
"metadata": {},
"field": "amount"
}
}
```
`amount` *mandatory*
: `integer` Payment amount in the smallest currency subunit. For example, if the amount is ₹500, enter `50000`.
`currency` *mandatory*
: `string` The currency in which the payment should be made by the customer. Length must be of 3 characters.
`receipt` *optional*
: `string` Your receipt id for this order should be passed here. Maximum length is 40 characters.
`notes` *optional*
: `json object` Key-value pair that can be used to store additional information about the entity. Maximum 15 key-value pairs, 256 characters (maximum) each. For example, `"note_key": "Beam me up Scotty”`.
`partial_payment` *optional*
: `boolean` Indicates whether the customer can make a partial payment. Possible values:
* `true`: The customer can make partial payments.
* `false` (default): The customer cannot make partial payments.
`first_payment_min_amount` *optional*
: `integer` Minimum amount that must be paid by the customer as the first partial payment. For example, if an amount of ₹7000 is to be received from the customer in two installments of #1 - ₹5000, #2 - ₹2000 then you can set this value as `500000`. This parameter should be passed only if `partial_payment` is `true`.
Know more about [Orders API](https://razorpay.com/docs/api/orders).
Descriptions for the response parameters are present in the [Orders Entity](/docs/api/orders/entity) parameters table.
The error response parameters are available in the [API Reference Guide](/docs/api/orders/create).
## 1.4 Fetch Payment Methods
Before calling `getPaymentMethods`, ensure you have initialised the SDK using `Razorpay.initRazorpay(key)`.
You can accept payments through Credit and Debit Cards and Wallets as per the methods enabled on your account.
* When you use Razorpay React Native Standard SDK, you do not have to handle the availability of different payment methods.
* When creating a Custom checkout form, you must ensure that only the methods activated for your account are displayed to the customer. To get a list of available payment methods, call `getPaymentMethods`. This fetches the list of payment methods asynchronously and returns the result in JSON format in the `onPaymentMethodsReceived` callback.
#### Sample Code
The following API is used to fetch all enabled payment methods for a given API Key ID:
```bash Curl theme={null}
https://api.razorpay.com/v1/methods?key_id=[Your_Key_ID]
```
```java Java theme={null}
razorpay.getPaymentMethods(new PaymentMethodsCallback() {
@Override
public void onPaymentMethodsReceived(String result) {
JSONObject paymentMethods = new JSONObject(result);
}
@Override
public void onError(String error){
}
});
});
```
```kotlin Kotlin theme={null}
razorpay?.getPaymentMethods(object : PaymentMethodsCallback {
override fun onPaymentMethodsReceived(result: String?) {
/**
* This returns JSON data
* The structure of this data can be seen at the following link:
* https://api.razorpay.com/v1/methods?key_id=rzp_test_XXXXXXXXXXXXXX
*
*/
Log.d("Result", "" + result)
inflateLists(result)
}
override fun onError(error: String?) {
Log.e("Get Payment error", error)
}
})
```
Check the [additional support for payment methods](/docs/payments/payment-gateway/react-native-integration/custom/additional-features) available with the Razorpay React Native Custom SDK.
**Handy Tips**
If you are using Subscriptions, you can pass the `subscription_id` in the options, which fetches subscription related details along with the payment method. This saves you a network call to get amount for that `subscription_id`. Know more about [Subscriptions](/docs/payments/subscriptions).
## 1.5 Import Razorpay Module
Import Razorpay module to your component:
```javascript Import theme={null}
import Razorpay from 'react-native-customui';
```
## 1.6 Add Razorpay Checkout Options to app.js File
Call the `Razorpay.open` method with the payment options. The method returns a JS Promise, where:
* The then part corresponds to a successful payment.
* The catch part corresponds to payment failure.
```javascript Payment Options theme={null}
{
var options = {
description: 'Credits towards consultation',
currency: 'MYR',
key_id: '',
amount: '50000',
email: "nur.aisyah@example.com",
contact: "+60345675444"
method: 'wallet',
wallet: 'touchngo'
}
Razorpay.open(options).then((data) => {
// handle success
alert(`Success: ${data.razorpay_payment_id}`);
}).catch((error) => {
// handle failure
alert(`Error: ${error.code} | ${error.description}`);
});
}}>
```
Know more about [passing callback URL](/docs/payments/payment-gateway/callback-url).
#### Checkout Parameters
`key` *mandatory*
: `string` API Key ID generated from the Dashboard.
`amount` *mandatory*
: `integer` The amount to be paid by the customer in sen. For example, if the amount is ₹500, enter `50000`.
`currency` *mandatory*
: `string` The currency in which the payment should be made by the customer. Length must be of 3 characters.
`description` *optional*
: `string` Description of the product shown in the Checkout form. It must start with an alphanumeric character.
`image` *optional*
: `string` Link to an image (usually your business logo) shown in the Checkout form. Can also be a **base64** string, if loading the image from a network is not desirable.
`order_id` *mandatory*
: `string` Order ID generated via the [Orders API](https://razorpay.com/docs/api/orders).
`notes` *optional*
: `object` Set of key-value pairs that can be used to store additional information about the payment. It can hold a maximum of 15 key-value pairs, each 256 characters long (maximum).
`method` *mandatory*
: `string` The payment method used by the customer on Checkout.
Possible values:
* `card` (default)
* `fpx` (default)
* `wallet` (default)
`card` *mandatory if method=card*
: `object` The details of the card that should be entered while making the payment.
`number`
: `integer` Unformatted card number.
`name`
: `string` The name of the cardholder.
`expiry_month`
: `integer` Expiry month for card in MM format.
`expiry_year`
: `integer` Expiry year for card in YY format.
`cvv`
: `integer` CVV printed on the back of the card.
**Handy Tips**
* CVV is not required by default for tokenised cards across all networks.
* CVV is optional for tokenised card payments. Do not pass dummy CVV values.
* To implement this change, skip passing the `cvv` parameter entirely, or pass a `null` or empty value in the CVV field.
* We recommend removing the CVV field from your checkout UI/UX for tokenised cards.
* If CVV is still collected for tokenised cards and the customer enters a CVV, pass the entered CVV value to Razorpay.
`bank` *mandatory if method=fpx*
: `string` Bank code. List of available banks enabled for your account can be fetched via [**methods**](/docs/payments/payment-gateway/web-integration/custom/payment-methods#fetch-supported-methods).
`wallet` *mandatory if method=wallet*
: `string` Wallet code for the wallet used for the payment. Possible values:
* `touchngo` (default)
* `grabpay` (default)
* `shopback` (requires [approval](https://razorpay.com/support/#request))
`callback_url` *optional*
: `string` The URL to which the customer must be redirected upon completion of payment. The URL must accept incoming `POST` requests. The callback URL will have `razorpay_payment_id`, `razorpay_order_id` and `razorpay_signature` as the request parameters for a successful payment.
`redirect` *conditionally mandatory*
: `boolean` Determines whether customer should be redirected to the URL mentioned in the
`callback_url` parameter. This is mandatory if `callback_url` parameter is used. Possible values:
* `true`: Customer will be redirected to the `callback_url`.
* `false`: Customer will not be redirected to the `callback_url`.
## 1.7 Store Fields in Your Server
A successful payment returns the following fields to the Checkout form.
* You need to store these fields in your server.
* You can confirm the authenticity of these details by verifying the signature in the next step.
```json Success Callback theme={null}
{
"razorpay_payment_id": "pay_29QQoUBi66xm2f",
"razorpay_order_id": "order_9A33XWu170gUtm",
"razorpay_signature": "9ef4dffbfd84f1318f6739a3ce19f9d85851857ae648f114332d8401e0949a3d"
}
```
`razorpay_payment_id`
: `string` Unique identifier for the payment returned by Checkout **only** for successful payments.
`razorpay_order_id`
: `string` Unique identifier for the order returned by Checkout.
`razorpay_signature`
: `string` Signature returned by the Checkout. This is used to verify the payment.
## 1.8 Verify Payment Signature
This is a mandatory step to confirm the authenticity of the details returned to the Checkout form for successful payments.
1. Create a signature in your server using the following attributes:
* `order_id`: Retrieve the `order_id` from your server. Do not use the `razorpay_order_id` returned by Checkout.
* `razorpay_payment_id`: Returned by Checkout.
* `key_secret`: Available in your server. The `key_secret` that was generated from the [Dashboard](/docs/payments/dashboard/account-settings/api-keys#generate-api-keys).
2. Use the SHA256 algorithm, the `razorpay_payment_id` and the `order_id` to construct a HMAC hex digest as shown below:
```html HMAC Hex Digest theme={null}
generated_signature = hmac_sha256(order_id + "|" + razorpay_payment_id, secret);
if (generated_signature == razorpay_signature) {
payment is successful
}
```
3. If the signature you generate on your server matches the `razorpay_signature` returned to you by the Checkout form, the payment received is from an authentic source.
Given below is the sample code for payment signature verification:
```java Java theme={null}
RazorpayClient razorpay = new RazorpayClient("[YOUR_KEY_ID]", "[YOUR_KEY_SECRET]");
String secret = "testWebhookSecret1234567";
JSONObject options = new JSONObject();
options.put("razorpay_order_id", "order_IEIaMR65cu6nz3");
options.put("razorpay_payment_id", "pay_IH4NVgf4Dreq1l");
options.put("razorpay_signature", "0d4e745a1838664ad6c9c9902212a32d627d68e917290b0ad5f08ff4561bc50f");
boolean status = Utils.verifyPaymentSignature(options, secret);
```
```php PHP theme={null}
$api = new Api($key_id, $secret);
$api->utility->verifyPaymentSignature(array('razorpay_order_id' => $razorpayOrderId, 'razorpay_payment_id' => $razorpayPaymentId, 'razorpay_signature' => $razorpaySignature));
```
```ruby Ruby theme={null}
require "razorpay"
Razorpay.setup('YOUR_KEY_ID', 'YOUR_SECRET')
payment_response = {
razorpay_order_id: 'order_IEIaMR65cu6nz3',
razorpay_payment_id: 'pay_IH4NVgf4Dreq1l',
razorpay_signature: '0d4e745a1838664ad6c9c9902212a32d627d68e917290b0ad5f08ff4561bc50f'
}
Razorpay::Utility.verify_payment_signature(payment_response)
```
```python Python theme={null}
import razorpay
client = razorpay.Client(auth=("YOUR_ID", "YOUR_SECRET"))
client.utility.verify_payment_signature({
'razorpay_order_id': razorpay_order_id,
'razorpay_payment_id': razorpay_payment_id,
'razorpay_signature': razorpay_signature
})
```
```c .NET theme={null}
RazorpayClient client = new RazorpayClient("[YOUR_KEY_ID]", "[YOUR_KEY_SECRET]");
Dictionary options = new Dictionary();
options.Add("razorpay_order_id", "order_IEIaMR65cu6nz3");
options.Add("razorpay_payment_id", "pay_IH4NVgf4Dreq1l");
options.Add("razorpay_signature", "0d4e745a1838664ad6c9c9902212a32d627d68e917290b0ad5f08ff4561bc50f");
Utils.verifyPaymentSignature(options);
```
```javascript Node.js theme={null}
var instance = new Razorpay({ key_id: 'YOUR_KEY_ID', key_secret: 'YOUR_SECRET' })
var { validatePaymentVerification, validateWebhookSignature } = require('./dist/utils/razorpay-utils');
validatePaymentVerification({"order_id": razorpayOrderId, "payment_id": razorpayPaymentId }, signature, secret);
```
```go Go theme={null}
import ( razorpay "github.com/razorpay/razorpay-go" )
client := razorpay.NewClient("YOUR_KEY_ID", "YOUR_SECRET")
params := map[string]interface{}{
"razorpay_order_id": "order_IEIaMR65cu6nz3",
"razorpay_payment_id": "pay_IH4NVgf4Dreq1l",
}
signature := "0d4e745a1838664ad6c9c9902212a32d627d68e917290b0ad5f08ff4561bc50f";
secret := "testWebhookSecret1234567";
utils.VerifyPaymentSignature(params, signature, secret)
```
After you have completed the integration, you can [set up webhooks](/docs/webhooks/setup-edit-payments), make test payments, replace the test key with the live key and integrate with other [APIs](/docs/api).
#### M1 MacBook Changes
If you use M1 MacBook, you need to make the following changes in your podfile.
**Handy Tips**
Add the following code inside `post_install do |installer|`.
```javascript podfile theme={null}
installer.pods_project.build_configurations.each do |config|
config.build_settings["EXCLUDED_ARCHS[sdk=iphonesimulator*]"] = "arm64"
end
```
## 1.9 Verify Payment Status
**Handy Tips**
On the Razorpay Dashboard, ensure that the payment status is `captured`. Refer to the payment capture settings page to know how to [capture payments automatically](/docs/payments/payments/capture-settings).
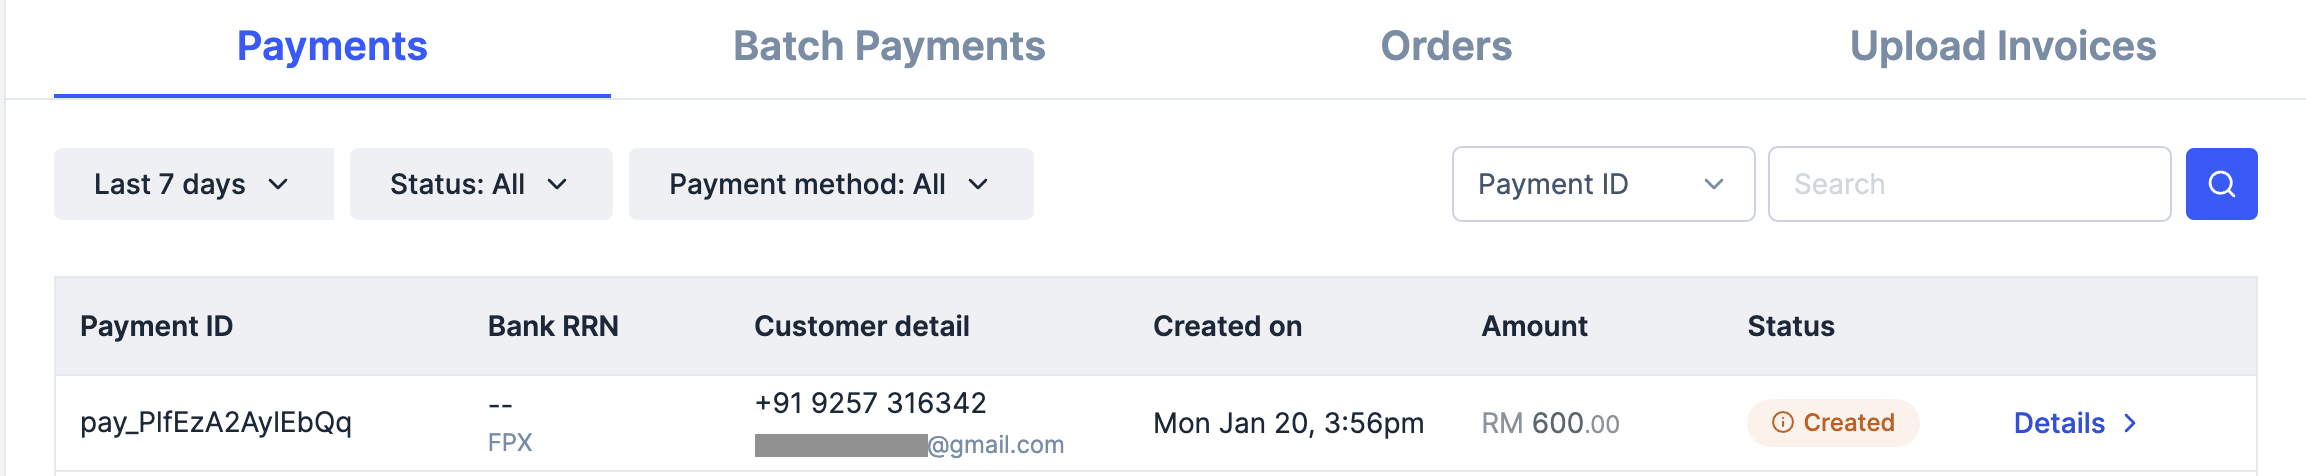
To verify the payment status from the Razorpay Dashboard:
1. Log in to the Razorpay Dashboard and navigate to **Transactions** → **Payments**.
2. Check if a **Payment Id** has been generated and note the status. In case of a successful payment, the status is marked as **Captured**.
 You can use Razorpay webhooks to configure and receive notifications when a specific event occurs. When one of these events is triggered, we send an HTTP POST payload in JSON to the webhook's configured URL. Know how to [set up webhooks.](/docs/webhooks/setup-edit-payments)
#### Example
If you have subscribed to the `order.paid` webhook event, you will receive a notification every time a customer pays you for an order.
[Poll Payment APIs](/docs/api/payments/fetch-all-payments) to check the payment status.
## Next Steps
[Step 2: Test Integration](/docs/payments/payment-gateway/react-native-integration/custom/test-integration)
## Related information
* [Saved Cards](/docs/payments/payment-gateway/web-integration/custom/features/saved-cards/scenario-1)
* [Payment Methods](/docs/payments/payment-gateway/react-native-integration/custom/additional-features)
You can use Razorpay webhooks to configure and receive notifications when a specific event occurs. When one of these events is triggered, we send an HTTP POST payload in JSON to the webhook's configured URL. Know how to [set up webhooks.](/docs/webhooks/setup-edit-payments)
#### Example
If you have subscribed to the `order.paid` webhook event, you will receive a notification every time a customer pays you for an order.
[Poll Payment APIs](/docs/api/payments/fetch-all-payments) to check the payment status.
## Next Steps
[Step 2: Test Integration](/docs/payments/payment-gateway/react-native-integration/custom/test-integration)
## Related information
* [Saved Cards](/docs/payments/payment-gateway/web-integration/custom/features/saved-cards/scenario-1)
* [Payment Methods](/docs/payments/payment-gateway/react-native-integration/custom/additional-features)